Budget Breakdown: How much does it cost to furnish a room?

ORC: Week 3 – Living Room Transformation

How to decorate a room in 6 weeks!  That’s the main goal of the One Room Challenge.  My ORC transformation room is my Living Room.

The 3rd full week of the One Room Challenge is now complete.  Quite honestly, I’ve had a busy week (being sick and then with work).  So, unfortunately, there aren’t too many visible signs that things are progressing on the room.  I am hopeful, however.  Most of my fabrics have been ordered and are either in transit or are already at my workrooms.  Here are a few of my workroom projects:

For my birthday in January, I bought myself this pair of George II style Gainsborough Library chairs.

George II style Gainsborough chairs

I found them online two years ago and nearly gasped in delight.  The Rose Tarlow “Kent” chair is, in my opinion, a gorgeous speciman of art with those dark scrolling legs!  I fell in love with this chair 25 years ago and never thought that I’d be lucky enough to own one (let alone two) of my very own.  For two years, I stalked them and imagined them in this room.  Finally, in January, I made the decision.  This is how I decided to bite the bullet.  I asked myself “would I be upset if someone else bought these chairs?” – after hemming and hawing to myself – I agreed that I would be very upset with myself if I didn’t buy them.  So, I contacted the owner, Erin at Erin Lane Estate in Oakland, CA  to ask a few more details.  She and her husband, Carlos, were extremely gracious over the phone and answered all of my questions.  I very much enjoyed working with them and highly recommend that you go to their gorgeous website and see what other goodies they have.  I hope to work with them again – as I had such a great experience.

These Gainsborough Library chairs never made it to my house – they were shipped directly to my upholsterer.  She’s going to reupholster them in Jim Thompson’s “Paradise Vine, pink” linen.

Jim Thompson’s “Paradise Vine, pink”

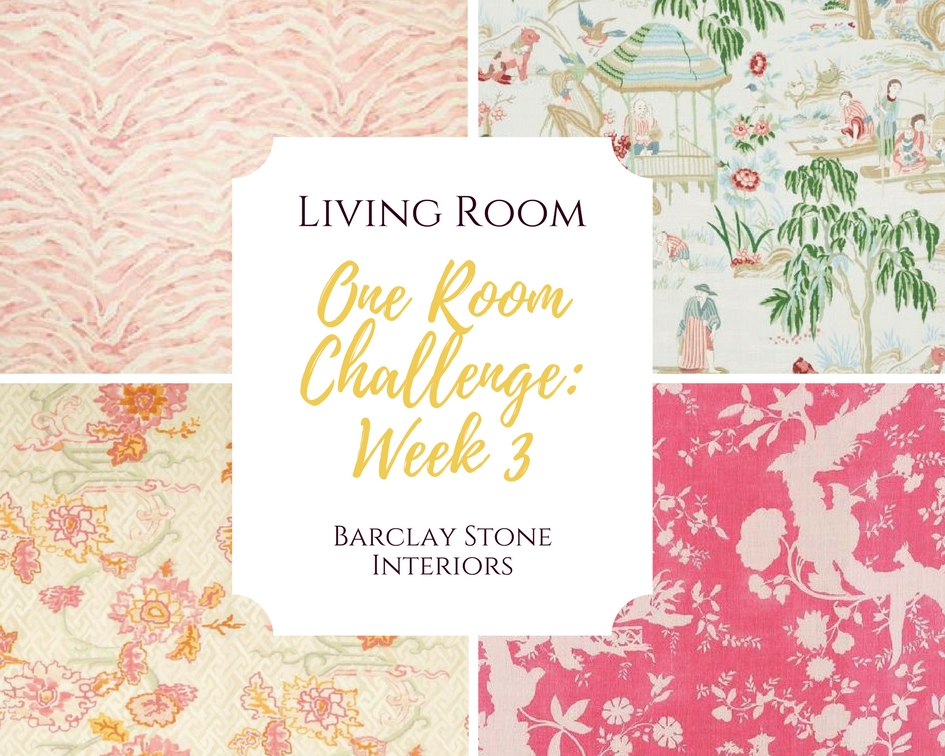
For my two existing upholstered chairs, I will have them reupholstered in Pindler & Pindler’s “Zanzibar, pink” zebra cotton and ornament the skirt with a sherbert pastel tassel fringe.

Existing yellow chair to be reupholstered in this “Zambezi, pink” zebra print fabric
“Zambezie, petal”

Here are a few other fabrics going into the space:

“Tao Fretwork, jade”
“Nirvana Shadow, pink”

And lastly – one of my surprise favorites for the room is this F. Schumacher’s “Yangtze River, aqua” fabric.  It, literally, was a fabric I picked up very last minute for a Client project.  But, after realizing it wasn’t going to work for her, I noticed the colors worked really well with my scheme!  So, surprise!  I’m going to have a couple of pillows made with it and place them on the pink zebra chairs.

F.Schumacher’s “Yangtze River, aqua” will be made into pillows for my pink upholstered chairs.

The only problem is that the fabric is back-ordered and won’t be shipping until the end of May.  So, it looks like I’ll have to post-pone my professional shots until some time in June….

The only real noticeable improvements taken in the Living Room redecoration this week was the trim color.  That’s a minor drama in itself.  But, long story short, the handyman that swore he was going to come on Friday to give me a final quote didn’t show, nor did he answer my calls and texts.  So Saturday morning I hopped over to the BenMoore store and bought my gallon of  “Chantilly Lace” paint and a good trim brush.  Thinking that I’d probably have to paint all of the trim myself, I spent Sunday afternoon taping off the fireplace area and a bit of Monday beginning to put the first coat on.  However, after a few hours of tedious trim painting, I had to quit.  I resolved to call one of my reliable painters.

Mike and his team answered my painting prayers.  Mike came over Tuesday evening to give me a quote.  And, by Wednesday afternoon, he and James came over to begin repair work on my trim.  Mike and his crew arrived bright and early this morning and applied the first coat of semi-glossy paint on my trim.  Already the difference is staggering!  I can’t wait for them to finish tomorrow.  

So that wraps up Week 3 for me!  Go ahead and see what the Featured Designers are up to HERE and the other Guest Designers HERE.

One Room Challenge, guest participant

Thanks for following along!  Please don’t forget to leave me your comments!

Until next week – Cheers!

One Room Challenge: Living Room Transformation

HOLD YOUR HORSES FOLKS!  It’s coming!  The One Room Challenge is back for the Spring season!

One Room Challenge, guest participant

The One Room Challenge is a 6-week blogging diary of a room transformation. This spring, I’m going to re-decorate my Living Room.

View of current Living Room

The One Room Challenge is now in it’s 7th year!  Amazing!  I was an avid follower early on – and then decided to try my hand at it.  Back in 2011, I turned my basement storage room into a tidy and bright Office space.  The results were (meh) – okay and it was definitely a transformation.  However, I had no idea how professional this challenge was – meaning, most participants hired professional photographers to shoot their AFTER photos (and, of course, I hadn’t thought of that – nor did I feel like my basement room merited professional photographs).  So, it took a few years for me to join in the fun again, but I did!  I started with my Family Room/Den back in the Spring of 2016 and since, have successfully finished 3 rooms.  And now, I’ll be transforming my Living Room.

Here is a photo of my Spring 2016 Den transformation.

One Room Challenge, spring 2016 DEN

And, my Fall 2016 flooded bathroom renovation.

One Room Challenge, Fall 2016 Guest Powder Room renovation

My Fall 2017 Client bathroom renovation turned out beautifully, but for various reasons, I can’t post any professional or overall shots of the space right now.

One Room Challenge, Fall 2017 Bathroom renovation scheme

Linda Weinstein, the Founder of the One Room Challenge, recently hosted a panel in Atlanta to discuss “Growing your Digital Brand”.  At the time, I wasn’t even remotely thinking about joining in the Spring One Room Challenge festivities.   However, after listening to Linda and her panel guests, I decided to rethink my decision.  I didn’t have any particular room in mind (as ALL of the rooms in my house need love!).  What’s that saying?  “The cobbler’s children have no shoes”?  Well, this designer’s house has no decorated rooms!   So, I could’ve selected any room – Dining, Entry, Master, Guest…but, my Living Room is the room that all guests see first.

MY LIVING ROOM.  It isn’t in deplorable shape.  As a matter of fact, I LOVE this room and use it often.  I decorated it in 2001 and the design easily transferred to our Atlanta house when we moved here back in 2007.  But, it’s been 17 years – and quite honestly, I’m just tired of looking at the yellow walls.  And, if you look closely – well, don’t – as the upholstery is a bit faded and stained (due to two wild boys running thru the space with muddy shoes and chocolate bars).  Plus, I’m ready for a change – something a bit softer.  And, the space planning could be updated – I’m not using the room to its full seating capacity!

existing Living Room (photo taken on a good day a couple years ago)
Existing Sofa

What I love most about the One Room Challenge, is that it forces me to make smart, but quick decisions.  I can make design decisions easily for clients, but when it comes to making decisions for myself, I definitely have too many options to choose from.  Often, I want to wait until the Spring line comes out or the Fall lines come out before I can make my final decision.  But, not this month.  No – this month – I will finalize and move forward with fabrics and trims that I’ve coveted for the past few years.

INSPIRATION.  The inspiration for my room is this oversized family portrait that was painted back in the early 70s.  I absolutely LOVE this painting and had hoped that I might “inherit” it when my parents downsized.  Unfortunately for me, it fit perfectly (in size and color) in their smaller house.  So, I won’t be able to use it in my transformation.  Instead, I’m going to paint my own contemporary art piece that will mimic the colors in this portrait – pinks, whites, soft turquoises, and soft greens.

Family Portrait – circa 1971
(I’m clutching my mom’s arm on the left)
Living Room fabric scheme

Sooo….stay tuned for what happens next week!  I can’t officially start yet – as I’m out of town for Spring Break.  But, you can be sure that I’ll be busting my butt trying to catch up with all of the other ORC Bloggers!  This should be fun!  And, tp see what the other ORC bloggers are doing – click here!

Please follow me and help boost my morale by posting comments every week!

Cheers! – Barclay

Bathroom Renovation: One Room Challenge – Week 2

2D Rendering of Bathroom Renovation Elevation

Are we ready everyone?  It’s Week 2 of the Bathroom Renovation for the Fall 2017 One Room Challenge!  And, guess what?  We’re plowing ahead and making great progress this week.

To recap, I’m an interior designer living in Atlanta and I’ve just started a bathroom renovation for my client, Rebekah.  She was kind enough to let me blog about this process (at the very last minute), so I’m hoping that we will be able to move quickly and successfully through the first phase of this challenge.  If you want to read my blog post from Week 1 Challenge , click here.

DEMOLITION DAYS:Demolition of Bathroom space demolition of bathroom space  

So, this past week we started her bathroom renovation project.

My contractor brought in a couple of guys to work in this tiny 4×8 space (not including the tub) to knock out the existing tile on the bathroom walls, shower/tub walls, and floor.  I think it was 95 degrees outside during the two demolition days.  No fan was allowed in the space because it would spread more dust and dirt around.  So, my poor guys had to tough it out.old toilet, now outside of house

No surprise.  We encountered a few “bummers” during demolition.  If you’ve ever done a renovation, you know what I’m talking about.  You hope and pray that whatever is lurking behind those walls is harmless, but, inevitably, something nasty pops up and “bums you out”!  Well, we had a little of that going on last week.Wall tile and medicine cabinet removed

The first bummer was the bathroom’s SUB-FLOOR (or what was left of it).  But, I anticipated that we’d probably have to replace the wood sub-floor (due to rot or age) and warned my client of this.  However,  (surprise, surprise!), in our case, the sub-floor wasn’t even wood – it was CEMENT!  Well, that threw us all for a little loop!   The cement was practically sand it was so worn down.  My contractor, Emilio, quickly and efficiently resolved that problem by chiseling out what was left of the existing cement sub-floor and replacing it with a new sub-floor with moisture barrier.

The next issue, however, really bummed me out as I could see that it was going to affect my re-design.yellow of existing tub

When the contractor removed all of the existing shower/tub tile, we could see that the “WHITE” tub was actually a YELLOW tub!  The previous owners had sprayed the original yellow tub  – white!  This was a problem for me because there was about 2 inches of yellow on the top face of the tub.  How the HECK was I supposed to mask that and pretend the yellow never existed??  I had to bring in Rebekah immediately and try to find a solution.  We had 3 options:

  1. Replace the existing tub with a new one.  This would be time-consuming AND costly.
  2. Re-surface the tub and make it all white.  Again, time-consuming and costly (although clearly not as costly as a new tub).  OR
  3. Build up the walls with enough layers of sheet rock + tile + sealant – to safely hide the existing yellow ground peeking out.

It was a no-brainer.  Rebekah went with option #3.  And, Emilio added a total of 3 layers of sheet rock to build up the back wall!  (yikes – that’s a lot of sheet rock!)  So, happily, crisis averted.

RENOVATION BEGINS:

With the demolition of the bathroom behind us, we are ready to pick-up speed and start putting the space back together.  This process takes a lot of juggling with tradesmen to get it right and keep the wheels churning.  Before our contractor can continue putting the walls back in, we needed the plumber to come out and update our shower fixtures – raise the shower head, re-plumb the sink faucet, etc..plumber working on the tub fixtures

Rob, the plumber, came in – did his handiwork in a short matter of hours then left us.  Done!  Rob will make a re-appearance later on! (possibly Week 5).  He will need to install the toilet and sink fixtures for us (after the wallpaper hanger comes in).

Next up – the electrician!  Julio is our amazing electrician for this bathroom renovation.  The existing bathroom only had one switch.  This switch turned on the one light fixture and that was it.  I need to mention that there is also a fan vent in the bathroom.  A fan that doesn’t work and doesn’t have a switch for it either.  Odd.Electrician measuring exact spot for sconces

Julio spent maybe a day with us.  His job was pretty important for the final success of this renovation because this bathroom is currently not very functional.  There are no outlets in the space.  So, if you were a guest – you wouldn’t be able to blow-dry hour hair in here or use any appliance that needs to be plugged in.  Also, the room is very dark.Electrician adding sconces

We’re removing the dated overhead sconce and replacing it with a pair of sconces.  We’re also adding a can light to the shower area, so that guests can see better when taking a tub or shower. Electrician adding can light to bathroom renovation project Lastly, we needed Julio to hook up the fan vent so that one could just turn it on with a flick of a switch (basically, connect that bad boy for ventilation!).

So, all of this was completed last week.  Somehow, when I write it down it doesn’t sound like a lot – but, it was.  Prepping the space for tile takes time and patience.  But, we’re in a good spot now – we’re ready for the tile and the pretty to begin!can lights added to shower areashower area with new niche

Rebekah and I made our final selections for tile.  We’ve ordered a very pretty Jeffery Court mosaic for the feature wall in the tub area.Homeowner selecting tile for her bathroom renovation project  With the exception of the niche, the remaining tile in the bathroom will be white carrera marble.  For the niche area, we hoped to use the Jeffrey Court mosaic, however, it’s pretty expensive.  bathroom schemeSo, we had 2 options – a beige glass subway tile or an antiqued mirror subway tile.jeffrey court mosaic with glass subway tile  Once again, when Rebekah and I saw the mirror tile – it was a no-brainer!  The niche HAD to be the mirror tile!  It will add a bit of glamour and sparkle to this fun bathroom renovation project.  We were so excited to find the mirror subway tile.  It added a little pep to our step last week!mirror subway tiles

Stay tuned for next week!  Tile and more tile!  It should be fun – the progress photos will really feel like things are coming together.

If you’d like to see some other One Room Challenge spaces, click here!  But, otherwise, I’d love to hear your feedback!  How would you have handled the yellow tub fiasco?  Did we do the right thing?

Cheers!  Barclay


Bathroom Renovation – One Room Challenge: Week 1

bathroom renovation One Room Challenge

Follow along with me – we’re doing a Bathroom Renovation!  Yeehaw!  Yup, it’s October and it’s time againI for the the semi-annual ONE ROOM CHALLENGE!

The ORC is a six-week challenge for bloggers to transform a room and make it gorgeous!  Every Thursday from now until November 9th, bloggers will post their progress on their websites/blogs and social media.  It’s 6-weeks filled with high-energy and lots of stress!  But, it’s FUN, too!  A challenge is always fun and I’m completely up for it!  This fall I’m going to renovate a Bathroom.

My friend and client, Rebekah, was considerate enough to respond in the positive yesterday when I asked her if I could use her Hall Bathroom as the One Room Challenge space.  She’s ALL in for the good, the bad, and the ugly!  But, it’s ALL going to be good.  When we’re at the end of this 6-week challenge, the room is going to look FABULOUS!!

But, hang on a sec – please let me show you a little bit of what we’re starting with!!  This is the “bad and the ugly” portion of the post.

bathroom renovation One Room Challenge
The BEFORE
bathroom renovation One Room Challenge
The BEFORE
bathroom renovation One Room Challenge
The BEFORE
bathroom renovation
the BEFORE

THE PLAN

bathroom renovation
Mood Board

A couple of years ago, I brought Rebekah a Thibaut wallpaper.  I suggested that it might work well in her Hall Bathroom (down the road when she decides to renovate).  So, Rebekah held on to that sample and brought it out when she decided that we were going to renovation the space.  “Bahia, metallic” is one of our inspirational sources.

The second inspirational source is the Powder Room renovation that I completed last winter.  I participated in last Fall’s 2016 One Room Challenge, but had to quit when I decided mid-renovation that I really wanted to expose a window that had been tiled over.  The window took 8 weeks to come in, and the ORC was over by that time.  No matter!  You can read about it here, if you’d like.  But, here are a few photos of the finished space!bathroom renovation from One Room Challenge Fall 2016

bathroom renovation One Room Challenge

bathroom renovation project One Room Challenge 2016

bathroom renovation project One Room Challenge 2016

CHALLENGES:

There are definitely a lot of challenges involved with this project.  The most important is going to be the coordination of the trades – who comes when, what will they be doing, etc…Timing is always crucial during a renovation – and if you are working with several trades  – the contractor, a plumber, an electrician, a tile installer, a cabinet maker, a wallpaper hanger – the designer or homeowner is going to have to make a list of all of the renovation steps prior to starting the project.  Inevitably during a renovation, things will go a little haywire – it’s to be expected.  So, we’ll see!  Fingers crossed.

If you’re interested in what the other Bloggers are doing for their One Room Challenges, click this link HERE to read what the others are doing!

Next week is demolition.  Stay tuned!

Cheers! Barclay


Design 101: Stair Runners – What You Need To Know

Stunning "Leopard Rose" Stark needlepoint stair runner with leopard and roses print. Accented with a brass stair rod.
Stunning “Leopard Rose” Stark needlepoint stair runner with leopard and roses print. Accented with a brass stair rod.

STAIR RUNNERS:  4 Reasons Why You Need a Stair Runner:  A Helpful Guide.  There are many folks out there (and, you may be one), who love the simplicity of a bare hardwood staircase.  But, not me.  I MUCH prefer a carpeted stair runner to a bare tread!   And, let me tell you why (hint: reason #4 is my favorite!):

Let’s be honest; stairs take a beating.  Think about it.  If you have stairs in your house, how often are you traveling up and down those babies?  LOTS.  Do you have kids?  Dogs?  How often are they running up & down those stairs?  Look at the treads – is the evidence of wear & tear showing?

Worn stair tread
Worn stair tread

If you don’t have a stair runner already, here are some reasons why you should think about installing one.

  1.  SAFETY.  Stair runners provide more traction and cushion to the steps – helping to prevent slippage.  (ex: socks on hardwood)
    Beige geometric stair runner on steps with brass rods
    Designer: Helen Green
  2.  NOISE REDUCTION.  I make a lot of noise when I wear my heals!  Stair runners mute those heavy footfalls!
    Greige geometric stair runner. Waterfall application down stairs.
    Greige geometric stair runner. Waterfall application down stairs. Photo: The Carpet Workroom
  3.  PROTECTS HARDWOOD.  It’s expensive to refinish hardwood floors and stairs!  Maintain the beauty of them by covering up the most visibly used area with a stair runner.
    Olive,black & eggplant wool plaid stair runner with decorative brass stair rods.
    Olive,black & eggplant wool plaid stair runner with decorative brass stair rods. Photo: Carpet Runners, UK
  4.  LOOKS FABULOUS!  Okay, now that’s the designer in me.  But, it’s true!  Stair runners, visually, warm up your entryway.  They help “invite” someone into your home.  The carpet you select for your stair runner offers you an opportunity to add your personality to it: do you prefer a casual, welcoming striped runner or a sexy and flirty cheetah spot?
    Wool cheetah print stair runner finished with a narrow cotton binding
    Wool cheetah print stair runner finished with a narrow cotton binding. Photo: The Carpet Workroom

Okay.  Now that I’ve got you in my court, I want to forewarn you about a few decisions that you’ll have to make prior to installing your stair runner.

CARPET SELECTION.  There are numerous options out there.  However, I just want to caution you to a few facts.  Not all rug weaves are suitable to be a stair runner.  Since a stair runner gets the highest traffic in a house, an ideal carpet for this area would be a tightly woven wool or cotton.

  • TIP#1:  Select a tightly woven or dense pile wool with a low profile (low sheered cut piles or small loops).  Carpets with a low profile are best (low sheered piles or small loops) because when the a tight or dense pile is bent over the tread, one is less likely to see the web backing of the carpet.

If you aren’t sure if the loop or pile is tightly woven or dense, try this test.  Take the carpet sample and bend it over a tread.  Do you see the back facing of the carpet?  If you do, then it’s not going to be a great choice for the stairs.

A split image of two carpet samples for a stair runner. The tight looped carpet on the left is ideal for a stair runner. However, the high pile carpet on the right is too plush. One can see the carpet web backing when it is bent.

  • TIP#2:  Some examples of rug weaves that might not be good options for stair runners are: Hand-knotted rugs, high cut pile carpets, rope weaves (too thick), jute rugs (too hard to clean), paper-fiber rugs (only suitable for low-traffic areas), cotton chenille rugs, polypropolene or outdoor rugs (too slippery), and some sisal rugs (again, might be too slippery).
    Flat weave style rug stair runner from Merida, great edge detail woven in!
    Flat weave style stair runner with great edge detail woven in! Photo: via Merida Carpets

Once you’ve selected your stair runner carpet.  You’ll need to make a couple more fundamental decisions.  When your professional carpet installer comes to your house, he (she) will ask you these 2 questions.  Your decision will affect how much carpet will need to be ordered.

Question #1:  HOW WIDE DO YOU WANT THE STAIR RUNNER?

A wool stair runner bound with a wide cotton tape shows about a 2-3
A wool stair runner bound with a wide cotton tape shows about a 2-3″ wood reveal. Photo: The Carpet Workroom

This is kind of a personal choice – as not all staircases are made equal.  However, there is an industry standard for the width of a stair runner.  In general, most runners are about 27″ to 30″ wide.  Personally, if you have pretty hardwood underneath, I think it’s great to show it off a bit.  I usually request a 2-3″ reveal on both sides.  There is no right or wrong answer.  However, the wider the stair – the more reveal you can have!

An example of a fully upholstered stair runner.
An example of a fully upholstered stair runner. Photo: The Carpet Workroom

And, let me add that some stairs are treads are not stained or meant to be visible (maybe they’re made of plywood).  In that case, a wall-to-wall installation is most appropriate (see photo above).

Question #2:  INSTALLATION STYLE:  Waterfall vs. Hollywood Wrap

I can hear you over there!  You’re saying “WHA???”  What the heck is Barclay talking about?  Okay – the visuals will be best to describe the two applications of installation.  But, here goes….

  • WATERFALL INSTALLATION:  This is the most common installation and it takes the least amount of carpet.  Essentially, the carpet is attached at the base of each riser, allowing the carpet to cascade over the tread – hence, waterfall.  This application is fantastic for patterned or striped carpets as the design runs fluidly down a straight staircase.
    A waterfall installation of an Antelope style stair runner.
    A waterfall installation of an Antelope style stair runner. Photo: Nicole Cohen
    A waterfall application of a woven cotton striped stair runner.
    A waterfall application of a woven cotton striped stair runner. Photo: The Carpet Workroom
  • HOLLYWOOD WRAP or UPHOLSTERED INSTALLATION:  In this application, the carpet is completely hugging each step.  The carpet is wrapped under the nose of each step and also attached at the base of each riser.  This installation requires more carpet and more installation time, but it gives a more tailored and refined look to the stair runner.
    A Hollywood wrap or upholstered style stair runner being installed.
    A Hollywood wrap or upholstered style stair runner being installed.

So…that’s it for now.  I hope that you’ve come away learning a bit more about stair runners.  But, if you should have any questions or need my help with selecting a stair runner for your house – don’t hesitate to contact me!

Cheers! – Barclay

Almost there! 50%

Budget Breakdown:
How Much Does it Cost to Furnish a Room?