Hello Everyone! You’ve landed on Week 3 of my Bathroom Renovation for the One Room Challenge! ![]()
To recap, I’m renovating my Client’s 1st Floor Guest Bathroom/Powder Room for this Fall’s ORC. The beginning stages during renovation were a bit nerve-wracking, (disintegrating floor, the tub was actually yellow and not white, electrical deficiencies, etc..) but after successfully fixing those “nail-biter” problems after the 1st week, we were able to start and finish Week 2 on a good note. If you’ve got time and energy, you can go back and read about Week 1 here and Week 2 here.
We ended last week with (essentially) a clean slate. All of the bathroom walls and floors were prepped and ready for Week 3’s tile installation. So that’s what happened first thing. TILE!! Here’s a photo of the very first marble tile being applied to the shower/tub wall.

Prior to the first tile being installed, there’s a lot of discussion going on between the tile installer and myself. Basically, we need to verbally “lay out” the design. I want to be sure of how the design is going to look before it gets cemented in stone (literally – ha!). The tile setter and I have to think about cuts and seams, etc. It takes a while, but it’s best and safest for both of us to be on the same wave-length before we begin.

I have to admit that I really love this phase of the renovation. When tile starts going up – the transformation almost becomes instantaneous! I mean, you can really start visualizing what the finished space is going to look like. And, it’s SOOO exciting!


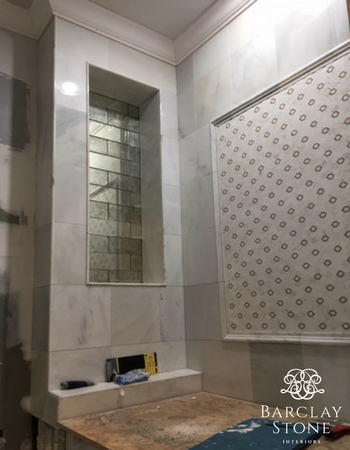
We selected this great looking hexagonal mosaic tile for its simplistic pattern and it’s color. The ground is a honed calcutta white marble. The beige metallic mosaic inserts blend perfectly with the Thibaut wallpaper, “Bahia” that will grace the walls.
Once the focal wall was finished, my contractor Emilio, moved on to tile the new niche. We used an antiqued mirror subway tile for this area. It added a bit of sophisticated glamour to the small space (plus, the price was right!)


Next step was creating the herringbone patterned floor design. We selected 12×24 marble tiles for our floor because I wanted to have long tiles for the herringbone pattern. The 12″ width was too wide to create a herringbone pattern. So, they were cut in half – making he finished tile size 6×24.


We started the pattern “V” right in the center of the doorway, to make the most impact.

Tiling pretty much took up most of the week (+ more). Soon after these photos were taken, the installer grouted all of the walls, the niche and the floor. He wanted to wait 24-48 hours for everything to settle before working in the space again.
That pretty much sums up our past week. Next week, we’ll be creating a wood panel front for the tub. We’ll prime the walls, ceiling and trim. Then paint everything. Hopefully, we’ll be able to get the wallpaper hanger over (but, I’m not certain that he’ll be able to make our ORC deadline!) before next Thursday to install the “Bahia” wallpaper. If he isn’t able to make it – then, next week’s post will certainly be a little THIN! Fingers crossed for us (as it is out of my control)! Don’t forget – this is happening in real time!
If you would like, read the blogs of the other One Room Challenge participants HERE. It’s fun to see how others approach renovation or decoration projects. Also, don’t forget to look at the ORC Guest Participants blogs HERE. There are a lot of us participating in this One Room Challenge. And, it’s always so awesome and appreciated when our readers and fellow bloggers take the time to read our blog posts, make comments and motivate us!
Have a great week! Cheers!