Budget Breakdown: How much does it cost to furnish a room?

POWDER ROOM Renovation: Week 3 ORC

Week 3 of my Powder Room renovation!  
To see my previous two blog posts click here for Week One ORC and Week Two ORC here. 
The walls are prepped and I’m pretty much ready to move forward with the decoration aspect of this renovation.   The only thing nibbling at me is the shower tile.  It’s just your basic builder-grade small white square tiles.  It’s nice, it’s clean, it’s white.  But, heck!  I’m a designer!  I feel like the One Room Challenge Gods may be looking down at me and cursing me for taking the easy route!  
So, yes – after several days of mulling it over – I decide that the existing shower tile has to go.  But, I know that there is a window behind all of that tile.  Am I opening up a can of worms?  YES!  I think we can all agree that removing the existing tile will certainly create new havoc with the renovation.
So, my tile guy is here.  I tell him that he’s got to get rid of the shower tile now before he lays the new floor.  He’s quick, efficient and careful.  Within about 30 minutes all of the tile is gone.  And 
VOILA!
BEAUTIFUL DAYLIGHT in my shower!  I am soooo excited that the sun is shining in here, I am thrilled with my rash decision.  David, my tile man, starts laying out the herringbone pattern I’ve decided on.  This is no easy task.  The marble didn’t come in narrow planks like I envisioned from all of those Pinterest pictures.  Rather, I had to buy a large rectangular tile and he had to cut all of them in half to get the narrow width that I was anticipating.  Plus, there were too many dark grey tiles in the mix – so, I had him eliminate all of those. 
Needless to say, David was patient and did a fantastic job with the floor.  I am THRILLED with how beautifully it came out.

So, now back to the exposed, yet rotting window….
I was in a bit of a dilemma last week.  I knew there was a window there – but I wasn’t able to get accurate measurements for it because it was behind the tile.  Therefore, I wasn’t able to order a new window ASAP (meaning, in enough time to finish off the ORC in 6 weeks).  But, I did order the window.  I really wanted a decorative casement window like this:
This is one of my windows in the front of my house.  However, wouldn’t ya know – the diamond pane windows are the most expensive ones!  (sigh…)   Okay, so I just ordered a regular 9-pane casement window.  It’s due to arrive the 1st week of November (no earlier) – the same week that the ORC officially ends.  (double sigh…)  But, as I said a while back – this is real life and I want to make my renovation the best that it can be within my budget.  So, I’ll still finish the ORC – it will just be on my own timeline!  (but aiming for November 11th).
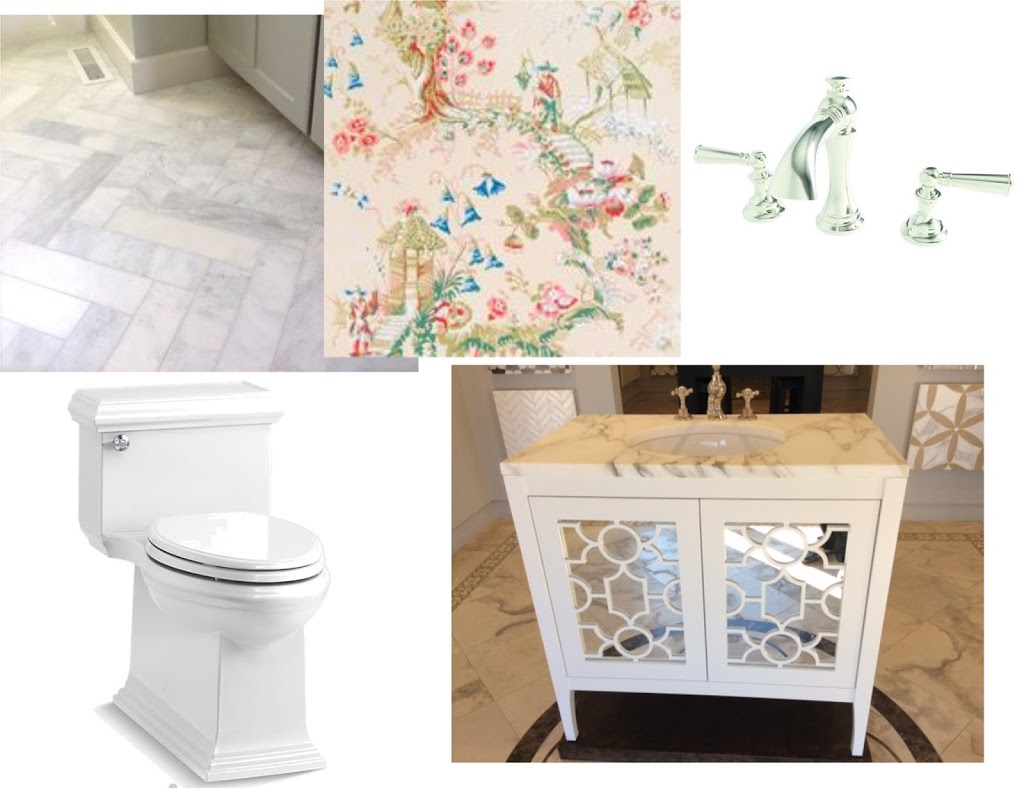
THE VANITY
INSPIRATION VANITY PHOTO 

WORKING DRAWINGS FOR CARPENTER

Happily, my vanity is coming along VERY nicely and very quickly!  The above (left) photo is the inspiration piece and the drawing (above right) is how I envision the custom piece.

Mitch Mitton, my carpenter extrordinaire, took my basic drawings and ran with it.  Here are a few photos of the doors being created.

Another photo of the door and here the front legs, too.

There’s a laundry list of what’s left to be done.
1.  Install new toilet
2.  Seal marble floor.
3.  Paint window.
4.  Install Window – remove old termite infested and rotting wood surround
5.  Put up green board in shower area
6.  Tile shower area
7.  Reinstall existing Shower head etc.  
8.  Finish installing base.  Install crown.
9.  Wallpaper.
10.  Install vanity, vanity top and backsplash.
11.  Reinstall sconces
12. Install towel bars and toilet paper holder.
13.  Accessorize and prep for professional photos.
And, sadly, only items #1 & #2 can be done before the window is installed.  But, the window delivery should be in about 2 weeks!  Gotta look on the bright side!
In the meantime, please see what the ORC Linking Participants are doing here and click here to see what the ORC Guest Participants (like me) are up to.  We post every Thursday!  Tootle-oo!

ORC Week Two: Powder Room Restoration

It’s the end of Week Two for my Powder Room restoration – One Room Challenge.  Thanks for checking back in!

For those of you that may be new to the post – the One Room Challenge dares you to design/redesign a room in less than 6 weeks.  There’s no prize – just the satisfaction of being
able to complete a project under the gun.  However, I’ve realized that in order to masterfully “finish” in time – you REALLY need to have a good plan mapped out for ultimate success.

 I’m telling you all of this because I didn’t “map out” this particular powder room renovation before I took the plunge and joined in the ORC fun.  Obviously, any kind of renovation work will have it’s fair share of bumps in the road, but this week, I uncovered a small pothole.

Read on…you’ll see.  It’s something that I knew about, but wasn’t mentally prepared to make a decision on until it was revealed- nor could I.

ORDER VANITY
I saw this gorgeous beauty of a vanity last winter in a showroom while sourcing tile for a client.  She didn’t need a vanity, but I took a photo of it anyway to remember it for another client.  Who KNEW that the deserving client would be “little ole me”!  How FABULOUS!  As it turns out, my champagne tastes and beer budget didn’t really allow me to be able to purchase this particular model.  So, I improvised and called up Mitch Mitton, the cabinet-maker extrordinaire!  I was lucky enough to catch Mitch in between jobs, so he was able to take on the task of recreating a vanity similar to this one for me.

I absolutely love the fret work on this piece.  However, the wallpaper that I selected is a Chinois pattern and I thought that I ought to use a more simple Chippendale-type of style fretwork to go with it.  Here’s the Pinterest photo that inspired the look for the new vanity fretwork:

Via

So, Mitch has taken on the project and he’ll create a more simple fretwork pattern (like this) for the vanity.

PUTTING IT BACK TOGETHER
The next task in this powder room was to strip the walls.  I was a little more than bummed about the damage to my Thibaut wallpaper.  But, I should be happy that I got nine years worth of looking at it.  It was so easy to strip, I think I did it in 20 minutes! HA!

            My jack-of-all-trades man, Luis came to patch the walls, install the baseboard and prime.
But, before he came, I knew that I had to get rid of the shower arch.  It wasn’t planned, but, the arch was driving me crazy.  It was low and kind of made the space feel a little claustrophobic.  OFF it went!  Yahoo!!  Immediately the difference was amazing – as you can see!


It gets better!  Luis hasn’t even repaired the walls or primed yet.  I’m SOOO excited to get rid of the blue walls.
                                                                       VOILA!

And, here we are at the end of Week Two.  The space is taking shape again and looking bigger.  I love the white and am excited about the next steps.  Or, am I?

Stay tuned for next week.  There’s a WINDOW behind the shower wall.  A rotted window.  I’m trying to cut costs with this renovation.  But, I’m not too certain that I want to keep the existing ceramic square tiles when I found such a gorgeous pearl shell tile to replace it.

                                                                DILEMMA
1.  Should I  tile over the existing window, even though it’s rotted?     (seems to be the least expensive route)
2.  Should I spend the money on a new window and tile over it using the pearl shell tile as the focal point on the wall?     OR,
3.  Should I spend the money on a new window, tile around it while forsaking my original design and apparant LUST for this pearl shell tile (and use the Pearl Shell tile, but at a minimum)?

Regardless, whatever I do, I can’t do much until the shower tile is removed and I’m able to look at the damage and measure the window and order a new one.  That happens tomorrow.

Ah the life of an interior designer!  Decisions, decisions!  Stay tuned for next week and I’ll tell you what I’ve decided.

In the meantime, please see what the ORC Linking Participants are doing here and click here to see what the ORC Guest Participants  (like me) are up to.  We post every Thursday!  Tootle-oo!


Fall 2016 – ONE ROOM CHALLENGE: Week One!

It’s BAAAACCKK!!

Yes indeedy folks – it’s Linda’s semi-annual ONE ROOM CHALLENGE again and this week I decided to throw in my towel and participate with the best of them!

After completing my Family Den project last Spring (see Final photos here) – I didn’t think I’d be attempting to complete another home project for the Fall.  But, I think “The Man Upstairs” had something else in mind for me. While out of town this summer, my 1st Floor Powder Room flooded – ruining the existing 1st Floor Powder Room space and pretty much wreaking havoc (read:  Mold City) in our basement.

The Powder Room floors and toilet were ripped out and dry wall was cut where the mold was growing.  Insurance covered a lot of the mold and flooding issues.  But, having an insurance agent come and itemize things along with a contractor and receiving the replacement cost check is a tediously slow and agonizing process.


During that time, I tried to imagine how I might redecorate the space and make it more to my liking. The old Powder Room was pretty, but dark.

I’m excited to renovate this Powder Room because I’d like to renovate more bathroom spaces for my clients.  I’m going to use this One Room Challenge process as my sounding board or guinea pig for future use.

Here is my scope of work:

1.  Remove existing Thibaut wallpaper
2.  Drywall walls, install baseboard, prime walls
3.  Remove exising ARCH in shower area
4.  Retile Shower Area
5.  New Vanity, top, faucets and sink
6.  New Toilet
7.  Install crown moulding
8.  Wallpaper
9.  Paint an existing free-standing cabinet
10.  Shower Curtain

A lot of hiccops occur during renovations.  So, I will start this process with my fingers crossed.  I don’t know if I’ll be able to finish in the 6 week time-frame.  But, I have a goal!

Stick with me, I’ll try and keep it interesting!

In the meantime, please see what the ORC Linking Participants are doing here and click here to see what the ORC Guest Participants  (like me) are up to.  We post every Thursday!  Tootle-oo!

ORC: Week 6: THE REVEAL

CatMax Photography
Okay – finishing this Challenge was AMAZING!
After six weeks of blogging, making quick and fast decisions, my Den makeover is DONE!
CatMax Photography
And, I am pinching myself over the transformation!
CatMax Photography
Remember these sad BEFORE shots?
And now my family has a beautiful room to sit their sweaty bodies on and jump on the sofa with their clay covered cleats!  YEA!
That is why these professional shots are so important to me.
It won’t get better any prettier after this!  But it’s DONE!
CatMax Photography
 Putting together a room in 6 weeks sounds pretty easy on Day 1 of Week 1.  And, it is actually.  If you know what the plan is and what you’re going to order – it should all run smoothly.  Right?
CatMax Photography
 HA!  Not always so!   But, I was very fortunate for this project and didn’t have to worry about fabrics not being in stock, deliveries not coming in on time, or workmen not being available.
In fact, all of my workrooms, vendors and photographer were really helpful and obliging.  So, first and foremost I have to thank them for all of their hard work (making me look good) and finishing on or before the deadlines.
CatMax Photography
 What makes this 6 week Challenge challenging is that you have to make firm decisions and then run with it.  You have to handle any type of decisions or problems quickly and efficiently.  Although I had all of my major pieces in the room by last week, the room lacked the finishing touches.  The window treatments weren’t up, the pillows, artwork, lamps and accessories were mising.
  ART
I’d previously purchased a large 60″ canvas from Wisteria.
I knew a more contemporary piece would help the room “pop”, but as it turns out – the artwork that I bought – although pretty – was more of a flop than a pop for the room.  It took a bit of courage, but on Mother’s Day, I brought out the acrylics and completely painted over the existing canvas.  While not a masterpiece, the new version brings a fresh vision to the room and brings the color around the space.  Exactly what I was looking for!
END TABLE LAMPS
As it turns out, the painted Tea Canister lamps weren’t “all that”.  I needed something a bit more sophisticated and young for the room.  I grabbed a pair of these crystal column lamps from my basement and added the Ballard Design green linen shades.  I think their simplicity was needed in the room (I mean, don’t forget, we have a pair of those Blackamore lamps across the way with the crazy spotted shades!).
SHEER ROMANS, DRAPERY PANELS & RODS

In truth, the biggest and best transformation to this room was the addition of more light.
Taking down and throwing out my faded (and ugly) mahogany wood blinds (that came with the house) was probably the best day for me.  As that was the day this room saw natural light!  WHOA!
 
But, a difference it made!
Thanks for following along with me for these past six weeks!  It was a blast!
If you’d like me to transform one or all of the rooms in your house – please don’t hesitate to contact me.  I work with clients in Atlanta and around the country and would LOVE to transform your
room too.  Call or email me!

Thanks Linda @ Calling It Home for this amazing and fun opportunity!

If you’d like to go back to the beginning and
see how my room transformed, click HERE .
If you’d like to see how the other 200 Guest Participants finished, click HERE.
And, the Featured Designers rooms, click HERE.

ORC: Week Five – Details Make the Difference!

You know those little design details that your interior designer keeps suggesting you use in your room?  You know, the “over the top”, “silly”, “not worth the expense”  design details?  Well, you ought to listen to your designer because those subtle details are the key elements that can turn your room from Hum-Drum to HELLO!

CHAIRS
Thibaut Cheverly Chairs
My chairs arrived!  I LOVE LOVE LOVE them!  The lime green leopard (which may seem a bit garish) is tempered by the chair’s classic, English design.  Plus, I was struck by the feminine bamboo legs, button tufts and nailhead trim.  I added a lime green tape underneath the nailhead trim to draw your eye down to those fabulous legs!  Did it work?
DRAPERY

I was so excited to pick up my drapery panels last Friday.  They turned out so well!
I specified details to help make the simple panels look a lot more special.  My workroom created goblet pleats with a “knot” design at each base, and we added a solid lime green contrast fabric trim along the top and leading edges of the panels.
DRAPERY ROD

As I mentioned in my last post HERE, I found all of the elements for my lucite rod/rings and brass bracket through the helpful posts from three other amazing bloggers.  Thanks to them and the abundance of amazing information one can find on the internet, I was successfully and quickly able to order all of the drapery hardware and have it shipped within a week!  UH-MAZING!

END TABLE LAMPS

I’d been dreaming about using these GORGEOUS celadon green slag lamps from Times Two Design.  They were a bit pricier than I wanted to pay.  However, this is how I feel about lamps.  Lamps are the jewelry to the room.  Part of the design details that I was talking about earlier, lamps can really change the feel of a room.  Undaunted by the price, I SO wanted these lamps to work.  However, the celadon green color seemed to dramatically clash with my lime green chairs (and not in a good way).  The lamps didn’t seem as “important” as I wanted them to be.  I’m picking at straws, but I also thought that maybe they were a bit too thin for the table….

 Anyhow, after that crushing blow, I had to think quickly about what type of lamp should go there.  Simple.  Dana Gibson’s Tea Caddy lamp!  But, I wasn’t so sure that her greens would work in my room.  Plus, I was kind of hoping to have a mix of green and blue in the lamp.  So, I called my lighting rep and she found me a pair of these green tea caddy lamps.  The green was fun- but, overall, the design was too serious.  Definitely wanted to lighten up the mood a bit!

Out comes my handy-dandy paint brush!
And, as I posted on Instagram this week…..

 hashtag  #EPIC FAIL!!
But, with some sound advice from a trusted facebook friend, I am now on the right track.  Not finished, but one can is painted white.

If the color works, I found these green lampshades.  Otherwise, white shades to the rescue!
CONSOLE TABLE LAMPS

Look at the adorable SHADES that Kristi from Sassyshades on Etsy created for me!  Made from Caitlin Wilson’s navy Spotty fabric, these shades are the exclamation point in my room!  I can’t thank Kristi enough for working with me and finishing way before the deadline!  Love her and the shades!!
ACCESSORIES & ARTWORK
I purchased this oversized canvas from Wisteria.  It looks pretty and works “okay” in the room.  But, I don’t like it.  It’s too representational.  I’d like something a bit more abstract and contemporary with a bit more color.  So, down to the wire – I’m thinking that I’ll try and paint over it.  We’ll see.  It’s one thing to paint lamps, but it’s another thing to try and tackle a 60″wide canvas a couple days before I have professional shots taken!  
To see what I did last week, please click HERE.  To see how the other One Room Challenge Guest Participants are up to, click HERE and to see what the Featured Designers are doing, click HERE.
That’s it for this week!  
See you at the REVEAL next Thursday!
Tootle-loo!

ORC: Week Four – Coming Together!

All of the pieces are slowly coming together, full circle

It’s great to see everything in my Den plan slowly coming together!

WALL CONSOLE
Last Thursday morning, I was happy to receive the Spencer console that I ordered from WAYFAIR .  


It came within less than a week after ordering!  I was VERY impressed!


And the quality was top knotch.

The glass has a beveled edge!

SOFA
The next morning, I was lucky to receive my new Lee Industries sofa!  

After years of spreading out on a short loveseat, this new, longer sofa will be the hit in my “girlie” mancave I’m creating!

Notice the blue/white banding trim around the bottom of the skirt.  I am pretty passionate about details like that.  The small details are what really transforms a room and makes it truly unique!
I selected this style sofa for several reasons – it had a masculine, tailored look to it, which I felt the room needed.  I also liked the simplicity of the “unfussy” bench-seat cushion and the angular arms.

OPEN ARMCHAIR
And, I was thrilled to pick-up my newly upholstered chair this week!

What a transformation!

Note: the lime green double welt detail

So, all-in-all, things are coming together in my One Room Challenge Den design.  

PAIR OF BENCHES
TO BE PLACED UNDERNEATH WOOD CONSOLE
However, I did have to relinquish one piece of my design.  I very much wanted to order a pair of Hickory Chair faux bamboo benches and upholster them in a blue velvet squares fabric.

 
 I have the fabric, but due to time constraints, I decided to not order the benches.  I was hoping that I’d be able to find something else.  However, I’ve been thinking about using these benches somewhere in my house (for years!).  I will probably order them and install later on.

DRAPERY HARDWARE
This was a fun and easy selection/decision for me.  Thanks to three FANTABULOUS blog posts that I read and pinned – from Kristen Jackson at The Hunted Interior blog, Grace from A Storied Style blog and Kris from Driven by Decor blog.  Thanks to their help,I was able to affordably order lucite acrylic rods and rings and brass bracket holders for my Den project!  I’m just waiting for all of the pieces to arrive.

via Driven by Decor blog

via Driven by Decor blog

ACCESSORIES
Lastly, I’ve been mulling over what type of accessories to use in the room.  I find accessories to be the most difficult part of an install.  Mostly because accessories are so personal.  But, because this is MY install and MY room, I think it’s even harder!  After trolling around the internet, I think my best accessorizing tool will be to find large blue/white porcelain ginger jars.  I’m cutting it down to the wire, but I’m going to head over to my local resources and see what I can find.  Here’s what I’m thinking about – I think the blue will help punch up the room a bit and bring the color around.


My TO DO list: What’s left?

1.  Blackamoor Lamps – finish painting them

2.  End Table lamps – make a decision – purchase shades

3.  Artwork over Sofa 

4.  Install window sheers – already purchased and received

5.  Finish purchasing and install drapery hardware

6.  Select & Purchase blue/white porcelain accessories for room

7.  Receive & Install chairs

8.  Pick-up and install pillows and drapery treatments
9.  Photograph
10. Final REVEAL!

To see what I did last week, please click HERE.  To see how the other One Room Challenge Guest Participants are up to, click HERE and to see what the Featured Designers are doing, click HERE.
That’s it for this week!  Tootle-loo!

ORC: Week Three – FRAZZLED!?&%$@*!

I don’t know about the rest of you, but I pretty much had a meltdown yesterday regarding my ORC plan.  I came to the realization that we’re at the half-way point already and I’ll have to ditch at least one (hopefully not more) of my planned items – due to the time contraint!  Good Heavens!!  
WHERE is everything??
Well, I shouldn’t complain – I received my newly lacquered coffee table.  It looks shiny and blue with it’s new coat of Denim by Sherwin Williams!
And, I was lucky.  Instead of having to order my area rug – I found this one already made up and ready to purchase at Myers Carpet.
So, IN THE CAR it went! – along with a rug pad!
SEE YA SOFA!!   “Hasta La Vista, baby!” (Hello Goodwill)
I dropped off my drapery fabric to my workroom last week.  I liked the look and details of this goblet pleat panel that I found on Pinterest and used this as my inspiration photo.
This is my drapery fabric and I asked my drapery workroom to replicate the knotted detail.
I also sent out my mother’s old white Living Room chair to get a much needed Botox injection!  Because I was in a rush to get things done, I completely forgot to take a Before photo of the chair in the room.  The chair has a great shape and is very comfortable.  It just needed a fresh and youthful makeover! Here’s the BEFORE of the chair.  You’ll have to wait until next week for the AFTER.


I’m upholstering it in this vibrant Raoul Textiles fabric and adding a bright pop of Lime Green as a contrast welt.  
And finally, my LAMPS.
After mulling over lamp options, I’ve decided to use some existing Blackamoor lamps that I own.
To get an idea of space, I moved in a console from another room and added a lamp for size.
But NOT THOSE Blackamoor lamps.  The color is all wrong!  I selected THESE Blackamoor lamps!


I’m a hopeless collector of Blackamoor lamps (long story).  Maybe I’ll write a quickie blog post about it this week.  Anyhoo!  Although these pups may look decent enough in these photos – the paint was chipped everywhere and the “white” was extremely dingy.  So, I grabbed my paint brushes this week and started their makeover!  They’re still a “work-in-progess” – but here’s what they look like so far (don’t judge)…
And, what’s going to make them UBER-FABULOUS is their topper!  
Now THIS custom shade will certainly bring a bit of the WOW factor to my room!  
You can find this shade and other equally stunning and fun shades at Kristi Uvence’s 
ETSY Store – SassyShades.
That’s it for this week!  If you’d like to see more rooms, please click HERE to see the ORC Featured Designers.  
Here’s what I did Week 1 and Week 2!
Tootle-loo!

One Room Challenge: Week Two

Okay!  Week One went off without a hitch.  I seem to have made some great strides in my DEN make-over.  Made lots of decisions last week and started ordering items.  Here is my FLOORPLAN:

ORC – DEN – new Floor Plan with new furniture

As a decorator, I always like to start the design process with a FLOOR PLAN.  It is like a road map for the room.  It tells me where the furniture should be placed and what size furniture will be appropriate for the space.  Also, it helps me identify the traffic pattern for the space.

BEFORE – dirty old chair in front of chest with boat, no mirror

After I have the floor plan tackled.  My next step is to try and find inspiration fabrics and pieces that will help me narrow down my choices.  I usually like to start with fabrics – as fabrics and trims are what I’m passionate about.

The fabric I started with is Pondicherry by Scalamandre.  

I have loved this fabric since it first came out.  Attracted to it’s cornflower blues and limeade greens, I bought a huge memo sample of it years ago and vowed that I would use it SOMEWHERE in my next house.  So, after I moved into this house, I started accumulating yardage of it.  I knew that (one day) this would be my drapery fabric.

Next up was trying to figure out how I wanted the overall look of the room to feel.  I’m a color fanatic and love seeing rooms with happy but tasteful bursts of color.  I, briefly, thought that my room should be all beige with the drapery treatment as the “pop”.


 Beige = Sophisticated, texture                                           Color = Fun, Flirty, Happy

However, I realized that if I had a beige room that wouldn’t be true to who I am as a person. Although I love the look of a sophisticated and serene beige room – that’s not who I truly am. So, I decided to put in more colorful upholstery pieces. Because in the end, colorful rooms make me more relaxed and happy. I wanted this Den project to reflect that.

So….LONG story short.  For my Den:  I ordered my sofa in a Pale Blue – Cowtan & Tout solid fabric. It has a great texture to it.  I also trimmed the bottom edge of the skirt with a Stout Brothers wide trim band.

   I ordered two Thibaut “Cheverly” chairs.  This was a big splurge for me.  I wanted a pair of matching chairs in this room.  I also wanted the chairs to be comfortable, masculine (but feminine) and comfy.  The Cheverly chairs have faux bamboo front legs.  And, I emphasized the nailhead trim by adding a banded tape around the bottom edge.  I upholstered them in a green/white Leopard fabric that I fell in love with (bring in the feminine!) from Lewis & Sheron.


I bought a coffee table online from the girls at Palm Beach Regency.  I hated to paint it – as it was painted white with pink details.  But, pink/white wasn’t quite my vision.  Hence, I had them lacquer it “Denim” blue from Sherwin Williams.

Sherwin Williams, DENIM

I was definitely struggling with end tables.  I envisioned a pair of painted creamy, transitional end tables.  I found them at Tritter Feefer – the Wynn Chest.  But, after adding up my costs for the room, I had to abandon this dream and settle for something more economical – like this end table from eBay.

As luck would have it – I got an email for a house sale about an hour away and came home with these two LOVELY BEAUTIES!!  SCORE!!!

   While buying these end tables, I thought that I might paint them a cream color.  But, I’ve since changed my mind.   I like the mahogany – it’s too pretty to paint over!


HERE ARE MY BEFORE SHOTS:


Please don’t forget to look at what the Featured Designers are doing HERE.  And, click HERE to see what the other GUEST BLOGGERS (like MOI) are doing.  That’s it for this week – stay tuned and don’t forget to comment!!


ONE ROOM CHALLENGE – Let the Party Begin!

That’s right – if it’s April – then it’s the start of semi-annual THE ONE ROOM CHALLENGE created by Linda over at Calling It Home.

Now in its tenth season, The One Room Challenge is a competition for bloggers and interior designers to re-design a room in just six weeks and document its progress in weekly blog posts.  You can read more about it here.

I participated in my first ORC about 3 years ago in which I transformed an unused room in my basement into an Office/Design Library.  I learned a lot that season.  Basically, my biggest take-away was that if I ever did the ORC again, that I would put a lot more planning and thought into the process (before just randomly signing-up a few days before….)!

ANYHOO….I’m very happy to say that I will be transforming our DEN for the 2016 spring One Room Challenge!

Our Den gets a lot of use as it’s the family gathering spot.  It’s where we watch television, gather as a family, play monopoly and huddle before dinner.

In essence, it’s our everything room.  But, it’s probably the room that’s gotten the least amount of “design attention”, since I kind of throw all of our leftover furniture in there.

But, this April/May, my DEN is going to have a makeover!  (woot woot!!)

LOVE these colors!!!!

But, here is my TO-DO List.  It is a bit overwhelming and I may not get everything done, but…C’est la vie of ORC!
1.  Order area rug.
2.  Order sofa.
3.  Order chairs.
4.  Order benches.
5.  Lacquer coffee table.
6.  Order fabric for drapery panels and send to drapery workroom.  Install.
7.  Order sheer blinds to cover windows.  Install.
8.  Select sofa end tables.
9.  Select end table lamps/shades.
10.  Select console table. Order.
11.  Select console table lamps/shades.
12.  Art over sofa.  Create new or paint over existing canvas.
13.  Paint existing ceiling fan.
14.  Reupholster existing open arm chair.
15.  Reupholster existing child’s open arm chair.
16.  Decide on fabrics and have pillows made for sofa and maybe chairs.

Hopefully, I can tackle everything on my list and not get shingles or hives or BOTH during this process (no joke – I’ve had shingles before and hives seem to magically “appear” when I’m super-stressed!).  But, not to digress….

I’m thrilled to be a Guest Participant with the 2016 One Room Challenge.   I hope that you will follow me on this journey and keep me entertained and positive with your awesome and uplifting comments!   (did you get the hint?)   PLEASE make comments!

In the meantime, please see what the ORC Linking Participants are doing here and click here to see what the ORC Guest Participants (like me) are up to.  We post every Thursday!  Tootle-oo!

Tales and Tea with Lord Charles Spencer

What an interesting afternoon I had yesterday!

The ASID Chapter of Atlanta invited 40 members to join Lord Charles Spencer (the late Princess Diana’s younger brother) for tea and conversation about Theodore Alexander’s Althorp Living History furniture collection at Matthews Furniture, here in Atlanta.


A little over ten years ago, Earl Spencer threw open the doors of Althorp, his family’s 16th century estate, to the furniture manufacturer, Theodore Alexander and allowed them to take over 10,000 photographs of furniture and accessories collected by 19 generations of Spencers.  From these photographs, Theodore Alexander was able to narrow down several thousand pieces of furniture to a mere 300.

What makes this line so special is it’s attention to detail.  Over 50% of the line’s pieces are direct replicas of furniture or accessories currently found in the circa 1508 Althorp estate.  The other 50% have been modernized to be more comfortable for today’s standards of living.

Marlborough Dining Room at Althrop – featuring the Seddon Chair
(otherwise known as the “Squiggle Chair” by family members)
designed in 1800 by George Seddon

Charles Spencer, after being introduced to the intimate group, spoke very graciously and knowledgeably about pieces from the line.  He would point out specific details from each piece and explain its history or importance.  I was exceedingly impressed by his breadth of knowledge regarding each piece.  So, when he ended his presentation, he graciously said that he would be more than happy to answer any questions while we took our tea.  I took this as my cue to quickly go over and monopolize him before the rest of the crowd did.

I was very curious to know how he knew so much about the history of the more important furniture and accessory pieces. Did he have to investigate the history of each piece?  Although he is an historian by trade, that doesn’t necessarily mean that he has an interest in the history of each piece of furniture.  He said that growing up he had an interest in the art and portraits at Althorp, as they all “told a story”.   However, he did not know much about the “stories” of the furniture.  Happily, his great uncle (also an avid historian) had collected the stories and details about the more iconic pieces and had written it all down in a notebook.  And some of these stories he passed along to us.

The Washington Blanket Chest

One such notable piece in the collection was an oak chest owned by a poor relation of George Washington’s, who lived on the estate.  This blanket chest, which currently houses the Earl’s tennis clothes, is so perfectly replicated that the finish includes a wine glass stain on the lid!

They’ve even replicated the note written by the village priest in 1877 authenticating that this chest was once owned by the Washington family before they emigrated to America

The Theodore Alexander pieces are so well crafted that no one will know the difference.  The Earl confirmed this by saying that he purchased a dozen of the Wootton Hall chairs for the Entrance Hall (as the originals are very delicate) and when the estate is open to the public, many want to sit on them.  The newer versions are much sturdier!

Wootton Chair by Theodore Alexander

Wootton Hall at Althorp

Although Lord Spencer did not mention it, he has a new book out called Killers of the King.  It’s “an investigation into the grisly fates of those who ordered the execution of Charles 1st.”  Because I’m an anglophile at heart, I felt I needed to read this juicy and riveting story and ended up purchasing a book and having him sign it!   I can’t wait to start reading!

CHEERS!

Almost there! 50%

Budget Breakdown:
How Much Does it Cost to Furnish a Room?