Budget Breakdown: How much does it cost to furnish a room?

Bathroom Renovation: One Room Challenge – Week 3

Hello Everyone!  You’ve landed on Week 3 of my Bathroom Renovation for the One Room Challenge!   

To recap, I’m renovating my Client’s 1st Floor Guest Bathroom/Powder Room for this Fall’s ORC.  The beginning stages during renovation were a bit nerve-wracking, (disintegrating floor, the tub was actually yellow and not white, electrical deficiencies, etc..) but after successfully fixing those “nail-biter” problems after the 1st week, we were able to start and finish Week 2 on a good note.  If you’ve got time and energy, you can go back and read about Week 1 here and Week 2 here.

We ended last week with (essentially) a clean slate.  All of the bathroom walls and floors were prepped and ready for Week 3’s tile installation.  So that’s what happened first thing. TILE!!  Here’s a photo of the very first marble tile being applied to the shower/tub wall.

And, TA-DAH!  Just like that – we started the tile work!  Piece piece installed!

Prior to the first tile being installed, there’s a lot of discussion going on between the tile installer and myself.  Basically, we need to verbally “lay out” the design.   I want to be sure of how the design is going to look before it gets cemented in stone (literally – ha!).  The tile setter and I have to think about cuts and seams, etc.  It takes a while, but it’s best and safest for both of us to be on the same wave-length before we begin.

Installer putting in 1st piece of Jeffrey Court specialty mosaic tile

I have to admit that I really love this phase of the renovation. When tile starts going up – the transformation almost becomes instantaneous!  I mean, you can really start visualizing what the finished space is going to look like.  And, it’s SOOO exciting!

“Bahia, beige metallic” by Thibaut

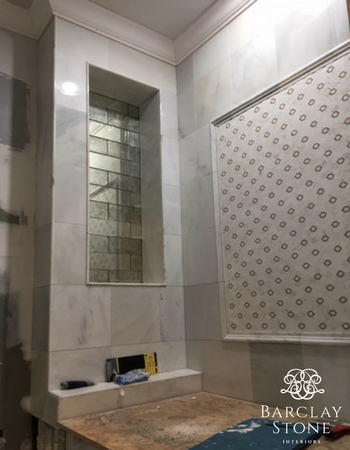
We selected this great looking hexagonal mosaic tile for its simplistic pattern and it’s color.  The ground is a honed calcutta white marble.  The beige metallic mosaic inserts blend perfectly with the Thibaut wallpaper, “Bahia” that will grace the walls.

Once the focal wall was finished, my contractor Emilio, moved on to tile the new niche.  We used an antiqued mirror subway tile for this area.  It added a bit of sophisticated glamour to the small space (plus, the price was right!)

Next step was creating the herringbone patterned floor design.  We selected 12×24 marble tiles for our floor because I wanted to have long tiles for the herringbone pattern.  The 12″ width was too wide to create a herringbone pattern.  So, they were cut in half – making he finished tile size 6×24.

Tile installer cutting the large tiles in half.
the 6×24 tiles stacked up and ready for installation

We started the pattern “V” right in the center of the doorway, to make the most impact.

Tiling pretty much took up most of the week (+ more).  Soon after these photos were taken, the installer grouted all of the walls, the niche and the floor.  He wanted to wait 24-48 hours for everything to settle before working in the space again.

That pretty much sums up our past week.  Next week, we’ll be creating a wood panel front for the tub.  We’ll prime the walls, ceiling and trim.  Then paint everything.  Hopefully, we’ll be able to get the wallpaper hanger over (but, I’m not certain that he’ll be able to make our ORC deadline!) before next Thursday to install the “Bahia” wallpaper.  If he isn’t able to make it – then, next week’s post will certainly be a little THIN!  Fingers crossed for us (as it is out of my control)! Don’t forget – this is happening in real time!

If you would like, read the blogs of the other One Room Challenge participants HERE.  It’s fun to see how others approach renovation or decoration projects. Also, don’t forget to look at the ORC Guest Participants blogs HERE.  There are a lot of us participating in this One Room Challenge. And, it’s always so awesome and appreciated when our readers and fellow bloggers take the time to read our blog posts, make comments and motivate us!

Have a great week!   Cheers!


Design 101: Stair Runners – What You Need To Know

Stunning "Leopard Rose" Stark needlepoint stair runner with leopard and roses print. Accented with a brass stair rod.
Stunning “Leopard Rose” Stark needlepoint stair runner with leopard and roses print. Accented with a brass stair rod.

STAIR RUNNERS:  4 Reasons Why You Need a Stair Runner:  A Helpful Guide.  There are many folks out there (and, you may be one), who love the simplicity of a bare hardwood staircase.  But, not me.  I MUCH prefer a carpeted stair runner to a bare tread!   And, let me tell you why (hint: reason #4 is my favorite!):

Let’s be honest; stairs take a beating.  Think about it.  If you have stairs in your house, how often are you traveling up and down those babies?  LOTS.  Do you have kids?  Dogs?  How often are they running up & down those stairs?  Look at the treads – is the evidence of wear & tear showing?

Worn stair tread
Worn stair tread

If you don’t have a stair runner already, here are some reasons why you should think about installing one.

  1.  SAFETY.  Stair runners provide more traction and cushion to the steps – helping to prevent slippage.  (ex: socks on hardwood)
    Beige geometric stair runner on steps with brass rods
    Designer: Helen Green
  2.  NOISE REDUCTION.  I make a lot of noise when I wear my heals!  Stair runners mute those heavy footfalls!
    Greige geometric stair runner. Waterfall application down stairs.
    Greige geometric stair runner. Waterfall application down stairs. Photo: The Carpet Workroom
  3.  PROTECTS HARDWOOD.  It’s expensive to refinish hardwood floors and stairs!  Maintain the beauty of them by covering up the most visibly used area with a stair runner.
    Olive,black & eggplant wool plaid stair runner with decorative brass stair rods.
    Olive,black & eggplant wool plaid stair runner with decorative brass stair rods. Photo: Carpet Runners, UK
  4.  LOOKS FABULOUS!  Okay, now that’s the designer in me.  But, it’s true!  Stair runners, visually, warm up your entryway.  They help “invite” someone into your home.  The carpet you select for your stair runner offers you an opportunity to add your personality to it: do you prefer a casual, welcoming striped runner or a sexy and flirty cheetah spot?
    Wool cheetah print stair runner finished with a narrow cotton binding
    Wool cheetah print stair runner finished with a narrow cotton binding. Photo: The Carpet Workroom

Okay.  Now that I’ve got you in my court, I want to forewarn you about a few decisions that you’ll have to make prior to installing your stair runner.

CARPET SELECTION.  There are numerous options out there.  However, I just want to caution you to a few facts.  Not all rug weaves are suitable to be a stair runner.  Since a stair runner gets the highest traffic in a house, an ideal carpet for this area would be a tightly woven wool or cotton.

  • TIP#1:  Select a tightly woven or dense pile wool with a low profile (low sheered cut piles or small loops).  Carpets with a low profile are best (low sheered piles or small loops) because when the a tight or dense pile is bent over the tread, one is less likely to see the web backing of the carpet.

If you aren’t sure if the loop or pile is tightly woven or dense, try this test.  Take the carpet sample and bend it over a tread.  Do you see the back facing of the carpet?  If you do, then it’s not going to be a great choice for the stairs.

A split image of two carpet samples for a stair runner. The tight looped carpet on the left is ideal for a stair runner. However, the high pile carpet on the right is too plush. One can see the carpet web backing when it is bent.

  • TIP#2:  Some examples of rug weaves that might not be good options for stair runners are: Hand-knotted rugs, high cut pile carpets, rope weaves (too thick), jute rugs (too hard to clean), paper-fiber rugs (only suitable for low-traffic areas), cotton chenille rugs, polypropolene or outdoor rugs (too slippery), and some sisal rugs (again, might be too slippery).
    Flat weave style rug stair runner from Merida, great edge detail woven in!
    Flat weave style stair runner with great edge detail woven in! Photo: via Merida Carpets

Once you’ve selected your stair runner carpet.  You’ll need to make a couple more fundamental decisions.  When your professional carpet installer comes to your house, he (she) will ask you these 2 questions.  Your decision will affect how much carpet will need to be ordered.

Question #1:  HOW WIDE DO YOU WANT THE STAIR RUNNER?

A wool stair runner bound with a wide cotton tape shows about a 2-3
A wool stair runner bound with a wide cotton tape shows about a 2-3″ wood reveal. Photo: The Carpet Workroom

This is kind of a personal choice – as not all staircases are made equal.  However, there is an industry standard for the width of a stair runner.  In general, most runners are about 27″ to 30″ wide.  Personally, if you have pretty hardwood underneath, I think it’s great to show it off a bit.  I usually request a 2-3″ reveal on both sides.  There is no right or wrong answer.  However, the wider the stair – the more reveal you can have!

An example of a fully upholstered stair runner.
An example of a fully upholstered stair runner. Photo: The Carpet Workroom

And, let me add that some stairs are treads are not stained or meant to be visible (maybe they’re made of plywood).  In that case, a wall-to-wall installation is most appropriate (see photo above).

Question #2:  INSTALLATION STYLE:  Waterfall vs. Hollywood Wrap

I can hear you over there!  You’re saying “WHA???”  What the heck is Barclay talking about?  Okay – the visuals will be best to describe the two applications of installation.  But, here goes….

  • WATERFALL INSTALLATION:  This is the most common installation and it takes the least amount of carpet.  Essentially, the carpet is attached at the base of each riser, allowing the carpet to cascade over the tread – hence, waterfall.  This application is fantastic for patterned or striped carpets as the design runs fluidly down a straight staircase.
    A waterfall installation of an Antelope style stair runner.
    A waterfall installation of an Antelope style stair runner. Photo: Nicole Cohen
    A waterfall application of a woven cotton striped stair runner.
    A waterfall application of a woven cotton striped stair runner. Photo: The Carpet Workroom
  • HOLLYWOOD WRAP or UPHOLSTERED INSTALLATION:  In this application, the carpet is completely hugging each step.  The carpet is wrapped under the nose of each step and also attached at the base of each riser.  This installation requires more carpet and more installation time, but it gives a more tailored and refined look to the stair runner.
    A Hollywood wrap or upholstered style stair runner being installed.
    A Hollywood wrap or upholstered style stair runner being installed.

So…that’s it for now.  I hope that you’ve come away learning a bit more about stair runners.  But, if you should have any questions or need my help with selecting a stair runner for your house – don’t hesitate to contact me!

Cheers! – Barclay

Almost there! 50%

Budget Breakdown:
How Much Does it Cost to Furnish a Room?