Welcome to Week 5 of our Bathroom Renovation in the 2017 Fall One Room Challenge event!
As you may remember, I am transforming and renovating an outdated and dysfunctional bathroom into a sophisticated, functional, and inviting guest bath for my discerning client, Rebekah.
The BEFORE
If you are new to this blog and would like to read about the Bathroom Renovation’s progress – read the earlier blog posts:
Week 1 here – where I show you the before photos of the lurid space and provide you with the mood board that I gave my Client. The, demolition begins!
Week 2 – design elements are refined, wall elevations are created, and the contractor prepares the space for tile installation.
Week 4, okay, sooooo I skipped writing a blog post last week! Sorry! But absolutely NOTHING happened in Week 4! We were waiting on the wallpaper hanger. I probably should’ve written a blog, to help with SEO, keep others interested in knowing more about my project. But seriously, there were crickets chirping in there last week!
Sooooo…..welcome to Week 5!
Wallpaper is ready to be hung!
Week 5 was great! I’m not gonna lie. We got a lot of items checked off my list and the bathroom is starting to look more and more like a brand new, shiny penny.
Tub panel in initial stages of completion
1. Bathtub Wood Panel. I haven’t really talked about this add-on project, but it’s a sensational idea and turned out fabulously! The circa 1940s style tub was looking a bit too…..flashy? dated? Okay, ugly for the likes of this soon-to-be pretty new bathroom!
The dated tub style
I didn’t want the tub to be the ugly step-sister in the room! So, we decided to hide it with a wood panel! I found a great visual on Pinterest for my Client and contractor. The concept is surprisingly simple, but the results are HUGE! It’s still a work in progress. We’re missing the marble slab that will hold on top of the wood panel. We were originally planning on using 3 white marble thresholds. However, my contractor isn’t keen on having seams in the marble. So, he’s going to have a single narrow slab of marble fabricated for the top.
Wood fillets added to outside frame. Creates a prettier and more traditional look to the tub panel.
The panel began as a flat sheet of wood, cut to size. 1X4 wood planks were cut to create the frame. And filler pieces created the more graciously detailed traditional look I was after. When painted gloss white……TA-DAH! Totally FAB!
Wood panel installed on tub face in bathroom
2. All trims were painted gloss white and the ceiling was painted a flat white. The walls were primed with 2 coats of Zinzer 123. We’re now ready for wallpaper!
Installed panel, now painted in a gloss white finish
Nelson rolling on the Zinser
3. Wallpaper installation. The bathroom area is tiny! The Thibaut “Bahia” wallpaper went up very quickly. And completely transformed the look of the room almost instantaneously! Seriously though, don’t you agree? The wallpaper has a beige ground with a darker brown metallic starburst. The metallic starburst color replicates the metallic browns in the specialty tile in the tub/shower area.
1st roll of wallpaper – GOING UP!
Bathroom wallpaper installation is complete.
4. Electrical. You may recall that the previous bathroom only had one switch, which turned on the lights. There wasn’t a switch to the exhaust fan (whaaa? Then, how did it work? It didn’t). There wasn’t even an outlet for a guest to plug in her hairdryer! (Say it ain’t so Barclay!). I KNOW!!
Visual Comfort “Etoile” sconces are installed
So, the electrician came in, installed all of the plugs, and also installed the two new Visual Comfort “Etoile” sconces in burnished gold!
And now that Week 5 is over, I’m very very nervous that we won’t be able to finish this Bathroom Renovation Challenge on time. We’re waiting for the sink vanity to be finished. Once it’s finished, a myriad of small tasks will need to be accomplished AND we have to get it professionally photographed. Unfortunately, I feel certain that (despite being granted an additional week to finish by the ORC committee) we won’t hit the deadline. But, fingers crossed. I’m still hopeful. Let’s send some positive juju vibes to my furniture maker! We need the vanity to complete my bathroom renovation!
Here’s my LIST going forward – let’s see what I can knock out by next week!
1. Order niche glass and glass clips – install
2. Vanity arrives – install
3. Baseboard underneath vanity – install
4. Order marble vanity top, have cut, attach undermount sink – install
5. Install shower fixtures, new toilet, sink fixtures
6. Install towel rod
7. Install mirror
8. Have client approve and order artwork to be placed over toilet (thinking tonal landscape images 2 or 3 framed)
9. Monogram towels
10. Photograph space
There are lots of other Guest Participants in the Fall 2017 One Room Challenge event. If you’d like to see progress on some of the other bloggers’s rooms – click HERE to take you to that page. The main group of blogger/renovators progress can be see HERE.
Thanks everyone for reading my bathroom renovation progress! I’d love to hear your feedback on the project! (okay, that’s sort of a shameless way of asking you to give me happy comments!)
Hello Everyone! You’ve landed on Week 3 of my Bathroom Renovation for the One Room Challenge!
To recap, I’m renovating my Client’s 1st Floor Guest Bathroom/Powder Room for this Fall’s ORC. The beginning stages during renovation were a bit nerve-wracking, (disintegrating floor, the tub was actually yellow and not white, electrical deficiencies, etc..) but after successfully fixing those “nail-biter” problems after the 1st week, we were able to start and finish Week 2 on a good note. If you’ve got time and energy, you can go back and read about Week 1 here and Week 2 here.
We ended last week with (essentially) a clean slate. All of the bathroom walls and floors were prepped and ready for Week 3’s tile installation. So that’s what happened first thing. TILE!! Here’s a photo of the very first marble tile being applied to the shower/tub wall.
And, TA-DAH! Just like that – we started the tile work! Piece piece installed!
Prior to the first tile being installed, there’s a lot of discussion going on between the tile installer and myself. Basically, we need to verbally “lay out” the design. I want to be sure of how the design is going to look before it gets cemented in stone (literally – ha!). The tile setter and I have to think about cuts and seams, etc. It takes a while, but it’s best and safest for both of us to be on the same wave-length before we begin.
Installer putting in 1st piece of Jeffrey Court specialty mosaic tile
I have to admit that I really love this phase of the renovation. When tile starts going up – the transformation almost becomes instantaneous! I mean, you can really start visualizing what the finished space is going to look like. And, it’s SOOO exciting!
“Bahia, beige metallic” by Thibaut
We selected this great looking hexagonal mosaic tile for its simplistic pattern and it’s color. The ground is a honed calcutta white marble. The beige metallic mosaic inserts blend perfectly with the Thibaut wallpaper, “Bahia” that will grace the walls.
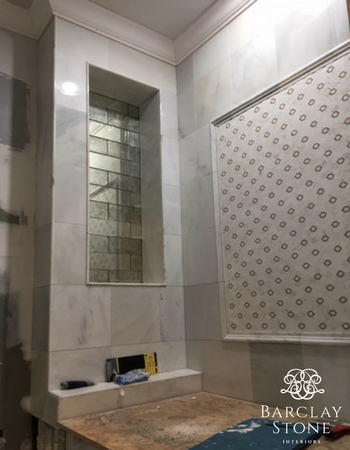
Once the focal wall was finished, my contractor Emilio, moved on to tile the new niche. We used an antiqued mirror subway tile for this area. It added a bit of sophisticated glamour to the small space (plus, the price was right!)
Next step was creating the herringbone patterned floor design. We selected 12×24 marble tiles for our floor because I wanted to have long tiles for the herringbone pattern. The 12″ width was too wide to create a herringbone pattern. So, they were cut in half – making he finished tile size 6×24.
Tile installer cutting the large tiles in half.the 6×24 tiles stacked up and ready for installation
We started the pattern “V” right in the center of the doorway, to make the most impact.
Tiling pretty much took up most of the week (+ more). Soon after these photos were taken, the installer grouted all of the walls, the niche and the floor. He wanted to wait 24-48 hours for everything to settle before working in the space again.
That pretty much sums up our past week. Next week, we’ll be creating a wood panel front for the tub. We’ll prime the walls, ceiling and trim. Then paint everything. Hopefully, we’ll be able to get the wallpaper hanger over (but, I’m not certain that he’ll be able to make our ORC deadline!) before next Thursday to install the “Bahia” wallpaper. If he isn’t able to make it – then, next week’s post will certainly be a little THIN! Fingers crossed for us (as it is out of my control)! Don’t forget – this is happening in real time!
If you would like, read the blogs of the other One Room Challenge participants HERE. It’s fun to see how others approach renovation or decoration projects. Also, don’t forget to look at the ORC Guest Participants blogs HERE. There are a lot of us participating in this One Room Challenge. And, it’s always so awesome and appreciated when our readers and fellow bloggers take the time to read our blog posts, make comments and motivate us!
Follow along with me – we’re doing a Bathroom Renovation! Yeehaw! Yup, it’s October and it’s time againI for the the semi-annual ONE ROOM CHALLENGE!
The ORC is a six-week challenge for bloggers to transform a room and make it gorgeous! Every Thursday from now until November 9th, bloggers will post their progress on their websites/blogs and social media. It’s 6-weeks filled with high-energy and lots of stress! But, it’s FUN, too! A challenge is always fun and I’m completely up for it! This fall I’m going to renovate a Bathroom.
My friend and client, Rebekah, was considerate enough to respond in the positive yesterday when I asked her if I could use her Hall Bathroom as the One Room Challenge space. She’s ALL in for the good, the bad, and the ugly! But, it’s ALL going to be good. When we’re at the end of this 6-week challenge, the room is going to look FABULOUS!!
But, hang on a sec – please let me show you a little bit of what we’re starting with!! This is the “bad and the ugly” portion of the post.
The BEFOREThe BEFOREThe BEFOREthe BEFORE
THE PLAN
Mood Board
A couple of years ago, I brought Rebekah a Thibaut wallpaper. I suggested that it might work well in her Hall Bathroom (down the road when she decides to renovate). So, Rebekah held on to that sample and brought it out when she decided that we were going to renovation the space. “Bahia, metallic” is one of our inspirational sources.
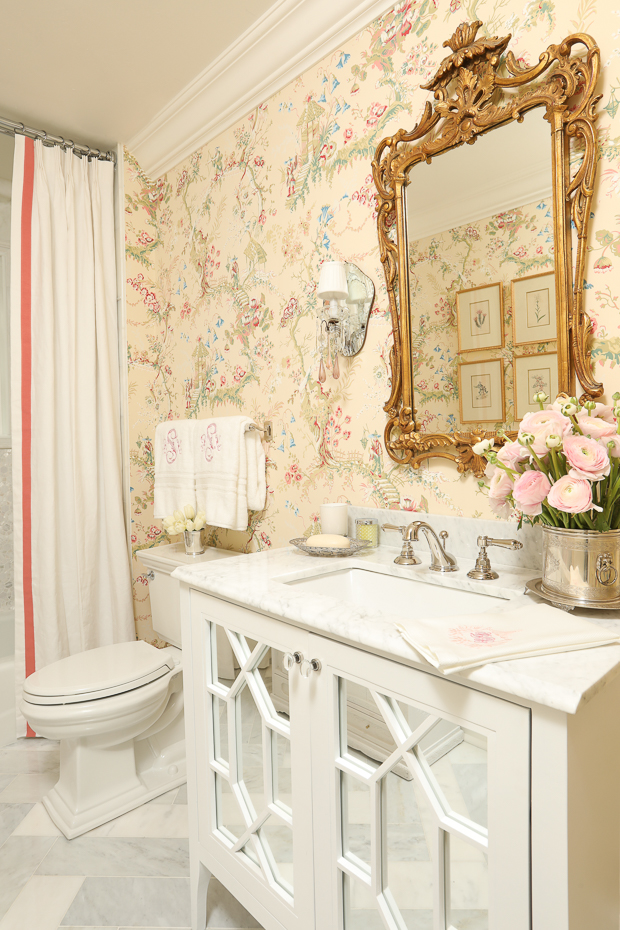
The second inspirational source is the Powder Room renovation that I completed last winter. I participated in last Fall’s 2016 One Room Challenge, but had to quit when I decided mid-renovation that I really wanted to expose a window that had been tiled over. The window took 8 weeks to come in, and the ORC was over by that time. No matter! You can read about it here, if you’d like. But, here are a few photos of the finished space!
CHALLENGES:
There are definitely a lot of challenges involved with this project. The most important is going to be the coordination of the trades – who comes when, what will they be doing, etc…Timing is always crucial during a renovation – and if you are working with several trades – the contractor, a plumber, an electrician, a tile installer, a cabinet maker, a wallpaper hanger – the designer or homeowner is going to have to make a list of all of the renovation steps prior to starting the project. Inevitably during a renovation, things will go a little haywire – it’s to be expected. So, we’ll see! Fingers crossed.
If you’re interested in what the other Bloggers are doing for their One Room Challenges, click this link HERE to read what the others are doing!
Next week is demolition. Stay tuned!
Cheers! Barclay
Almost there!50%
Budget Breakdown: How Much Does it Cost to Furnish a Room?